User Guides
Cmsmart Fullstore Quickstart Package

About product WordPress Online Product Designer NEXT

WordPress Online Design

Developing printing technology will be a part enhance life quality. If do you not have experience in photoshop, but you also want you or your customer can create their own design as customizing T-shirts, mugs, pillows, photos, canvas, business cards, phone cases and so on. It is very easy if your site integrated WordPress Online Product designer. WordPress Online product designer plugin is the best extension and indispensable condition for all printing website at this time.

BASIC INFORMATION

Author            Netbase Team

Visit us           WordPress Online Product Designer

Changelog      Click to view

Support          @Support Service; @CMSMart Community

License           GLPv2

BENEFITS

This is a new powerful design tool that helps customers customize multiple printing products, create a complete solution for the printing business. WordPress Online Product designer is a responsive plugin packed with exclusive functionality that provides customers a great experience with the high-quality outcome. With customizable product collection, customers can get a vast artwork gallery with flexible custom options like clipart, Google font, color, style and so on. The user also adds text & number or personalized image. An online product designer simplifies a creating product process, suitable for all kinds of customers.

The design tool is easy to install and provide final outcome in the printing process. Come with many ideal features, this plugin enables the users to showcase unique ideas and make an awesome design through smooth clickable options like rotating, dragging and flipping of text & picture. The designed outcome can be shared through many social channels. Besides, an administrator can set up the price as well as manage information of your customer or all designed product easier.

You can design anything - You can design as the bag, banner, bookmark, business card, button, calendar, cap, catalog, cd cover, certificate, door hangers, envelope, invitation, label, lettering, phone case, mouse pad, mug, notepad, photo album, poll sign, postcard, posters, shoe, signage, sticker, tag, t-shirt, x stands,…

HIGHLIGHT FEATURE

  • Add text and curved text
  • Add art features
  • Uploading Images
  • Free Hand Drawing
  • Add QR Code
  • Powerful Layers
  • Powerful Help Tool
  • Easy preview with zoom function
  • Get photo dropbox, google drive
  • Assign a user as a designer
  • Share Design
  • Design Profile Template page
  • Save design for later
  • Export Design to SVG
  • Export design to JPG high revolution, CMYK mode, and ICC profile
  • Order again the previous order which includes design file
  • Get design from the wishlist, cart and design Store
  • Upload Design without custom design
  • Update the gallery page

Above is a short introduction to the product WordPress online Design plugin. For more details about the product, please visit the WordPress NB Designer Plugin. If you want to try this product, please access the WordPress Online Design Plugin Demo. If you like this product and have any questions, please contact our Sales Consultant Manage or give your question here. Thank you for reading and keep following us to get more information in the next article! Bye, See you soon!

Vincent
Sales Consultant Manage 

Skype: live:vincent_4281
Phone/ WhatsApp: +84 868 901 261
Email: [email protected]

An Essential Plugin – Must have for a Digital Printing Website NEXT

digital-printing-website.png

As you know, for a website, especially in printing, having a range of products is not enough, because the needs of customers are unlimited, you need a tool to help your customers get what they want.

Woocommerce product designer plugin is the solution for you. It will ensure that your customers can have printing products bringing their own style, make them be unique among the crowd. The strength of this WordPress plugin is motivating the creativity of everybody.

Preferred products must always come with the outstanding features. To be a plugin that is popular and trusted by thousands of customers, Woocommerce Product Designer must have outstanding features that are not available in any other equivalent products. So what are those highlight features?

Let's go and see how it suits you!

1. Add text and curved text in NBdesigner

text-and-curve-text-in-nbdesigner.jpg

Shopper can add text with various colors, fonts, and sizes. Especially, they can curve text in their design and edit anything of text as shadow, pattern, rotate, opacity, outline, line height, background, etc. View detail here: Add text in Wordpress online design plugin

  • Any text and font are available for your choice.
  • There are plenty of fonts being included in Font Category, shopper can find it by pressing ‘More button’.
  • Font style includes italic, bold, underline with full type of alignment such as left, center, right or justified.
  • Font color is varied.
  • Text background is available and changeable.
  • Text pattern is available.
  • Creating text shadow according to dimension X or Y. Shadow blur, opacity, shadow color also can be changeable.
  • Line height, font size and opacity are changeable.
  • Outline’s color and size are changeable.
  • Text layer can be measured.
  • Text can be turned, curved or rotated/reversed.
  • Spacing is changeable.
  • Default style such as arc, straight, small to large, large to small top, large to small bottom is changeable.

2. Add art feature Easily

art-feature.jpg

  • You can add art, change colors, move, resize, rotate and delete art, flip, center function and so on
  • Art’s color can be customized.It not only give an easy way to manage color but also allows customers to change color of each part on this image
  • Art can be rotated and changed its opacity.
  • Art can be zoomed in or zoomed out.
  • Art can be moved or deleted.
  • Multiple arts can be added.

3. You can upload images quickly

upload-image-in-nbdesigner.jpg

  • If shopper don’t satisfied with sample picture, they can upload images as they want. They also can select from different many sources as Facebook or enter image’s url.
  • Picture can be uploaded from local, url or social network such as Facebook.
  • Temporarily saved uploaded files for later use.
  • Uploaded file is typed as PNG, JPG, GIF. Its maximum size can be adjusted in backend. 
  • Art can be zoomed or rotated.
  • Creating text shadow according to dimension X or Y. Shadow blur, opacity, shadow color also can be changeable.
  • Picture’s opacity can be customized.
  • Four types of quick-changing picture are available.
  • Picture can be turned via tool.
  • Picture crop styles are varied such as crop tool, lasso tool, heart shape, round or star shape, etc. The picture can be reset back to its origin. 

4. Improving UX with free-hand drawing

improving-ux-with-free-hand-drawing.jpg

  • Especially, you also can use many available brush to draw, you can create your own signature.
  • Drawing brushes such as pencil, circle, spray, pattern, square, texture are available for different choices.
  • Brush and brush width color can be changed.
  • Add available geometries as rectangle, circle, triangle, line and polygon. And can change color, rotate, opacity.
  • Picture can be turned or zoomed.
  • Picture’s opacity can be customized.

5. More professional by add QR code feature

qr-code-features-in-nbdesigner.jpg

  • You can create QR code and then add to your design
  • Text or QR codes can be added into picture.
  • Picture can be zoomed.
  • Picture can be moved or rotated.

6. Powerful layers

powerful-layer-in-nbdesigner.jpg

  • Drag and drop to sort layers and change layers of items
  • Layer position can be dragged to different positions.
  • Layer(s) can be deleted partly or entirely.
  • Scroll can be created when multiple layers exist.
  • Certain buttons are used to quickly change layer’s position.
  • Layer can be displayed or hided easily.

7. Powerful help tool

  • More tools are included extension as next, zoom in, zoom out… All buttons are arranged clearly for convenient use.
  • Double player
  • Next to the left, right, up or down
  • Layer can be reversed from left to right or from above to below.
  • Vertical align, horizontal align
  • Layer can be zoomed.
  • Layer can be deleted.

8. Easy preview with Zoom function 

  • After designing, you can preview it with zoom and view function
  • Review all design.
  • Zoom in for details.
  • Popup full screen.

9. Other features of woocommerce product online design

  • Easy to use. Shopper can easily use this product, it is very friendly with customers, and special it is very simple to use.
  • Compatible with WooCommerce. This plugin is an extension of WooCommerce plugin that allows your users to design products easily
  • 100% responsive and mobile friendly. You can design on any device as desktop, tablet or mobile
  • Various fonts. There are many fonts are included in this product. Admin also can add more fonts if they want
  • Easy manage products with online design. Products with online design on Front-end will be add on checkbox to distingue with Product without online design
  • Flexible config. You can set size upload, preview thumbnail size, thumbnail quality, show customer design in cart, show customer design in order, admin notifications,….
  • Easy view detail design of customer. After customer design, admin can view detail design of customer in order management page in backend
  • Accept or decline design and send email. After receiving your design, Administrator will consider and send an email notification to customersto inform that their design is accepted or rejected.
  • Customer design again easily. If your design is rejected, please go to your account to design again. You can design until approving.
  • Power helpdesk. The customer can easily design with power helpdesk.

Above are some highlight features in the WooCommerce Product Designer plugin. I hope the post brought you much useful information. If you want to try this plugin, please click WordPress Online Product Design DEMO! If you have any questions about the product, please contact the CMSmart Support team or Mr.Vincent at the contact information below. They will answer all of your questions. Remembering to use coupon code MAR_DL to get 18% discount for this item.

Vincent
Sales Consultant Manager

Skype: live:vincent_4281
Phone/ WhatsApp: +84 355 993 306
Email: [email protected]

System requirement for WordPress Online Design Plugin NEXT

System requirement for WordPress Online Design Plugin.jpg

In order to use and install a software product smoothly, it is necessary to meet the system requirements of this product. Therefore, information on system requirements for products is extremely necessary for customers. In particular, with a product that many customers are interested in, #1 Best Selling Online Product Designer Plugin for WooCommerce WordPress, is one of the indispensable conditions. So, in this article, I will introduce the system requirements of WordPress Online Product Design for you to understand more. Now, here we go!

System requirements of WordPress Online Designer

Your site must be running on WordPress 3.1 or higher, PHP5.3 or higher, and MySQL 5 or higher.

Recommended PHP Configuration Limits: many issues that you may encounter, for example, cannot update the new version, cannot log in admin Online Designer, the selected product shows blank and so on…All these issues are related to low PHP Configuration Limits. The solution is to increase the PHP. You can do this by yourself or ask your website admin.

Please make sure that your server is supported:

  • fix_pathinfo = 1
  • allow_url_fopen = on
  • upload_max_filesize = 100M
  • Server supported JSON

Note: This is step by step you can check environment requirements:

  • Create file info.php
  • Add content to this file:
  • <?php echo phpinfo(); ?>
  • Upload to your host folder-your-site/info.php
  • Open link yoursite.com/info.php and check all options.

If your server does not support you, please call to host manager and ask for support.

Above are some system requirements for WordPress's Online Design Product. I hope they brought some useful information for you. If you like this product and want to try, please access the WordPress NBDesigner Demo. Do you have questions about this product? Please contact the CMSmart Support team or leave comments immediately below. We will answer any questions for you!

Thank you for reading and keep following CMSmart Community to get more information in the next article! Bye, See you again!

Vincent
Sales Consultant Manager

Skype: live:vincent_4281
Phone/ WhatsApp: +84 355 993 306
Email: [email protected]

How to Install the NBDesigner WooCommerce Plugin (2.17.0) NEXT

Applies to Cmsmart Product Designer (NBDesigner) 2.17.0 — updated October 2026. Requirements below are read from the plugin README and header.

In short

  • You need WordPress 5.6+, PHP 8.0+, WooCommerce 8.0+ with WooCommerce active.
  • Upload the .zip, activate, then follow the setup wizard (General setup › NBD Pages › Overview).
  • Connect a license in step one, tick Enable Design on a product, and click Start Design to test.

The NBDesigner plugin (Cmsmart Product Designer) adds an online design editor to WooCommerce so shoppers can personalise products before ordering. This page is the install guide for version 2.17.0. If you only want the trial download, start with the free trial guide.

What do I need before installing?

RequirementMinimum
WordPress5.6
PHP8.0
WooCommerce8.0.0
MySQL5.7
Plugin dependencyWooCommerce must be active

Back up your site first, as with any plugin install. If you are on a release older than 2.15.0, update now: version 2.16.1 (and later) closes an image-import hole that let an unauthenticated visitor upload an executable file on those versions.

How do I install NBDesigner step by step?

  1. Upload. WordPress admin › Plugins › Add New › Upload Plugin, choose the plugin .zip, click Install Now.
  2. Activate. Click Activate Plugin. A new Cmsmart menu appears and a fresh install opens the setup wizard.
  3. Connect your Cmsmart license. Enter your store email and click Activate my license to start the free 30-day trial, or paste a license key you already have.
  4. General setup. Pick the Dimension unit (cm, in, mm, ft or px) used to calculate the design area, and the Font subset for your language.
  5. NBD Pages. Keep Create default NBDesigner pages ticked: Create your own page, Designer page, Gallery and Redirect login.
  6. Overview. Finish and open the Cmsmart overview.
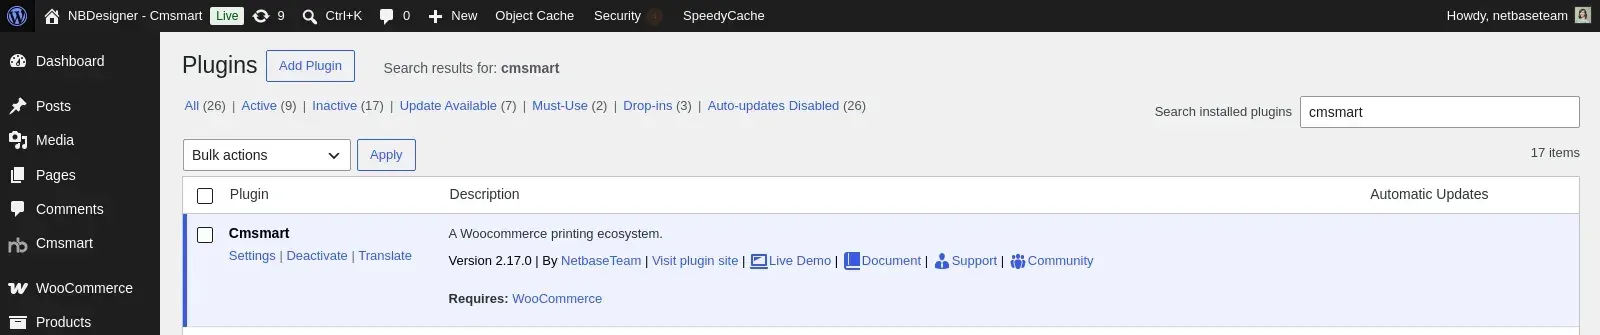
WordPress Plugins screen with the active Cmsmart plugin, version 2.17.0, requiring WooCommerce
After activation: the Cmsmart plugin row shows the version and the WooCommerce requirement.

If you skip the wizard you can activate later under Cmsmart › License: paste the key from your Cmsmart account and click Activate.

How do I enable the designer on my first product?

  1. Go to Products and edit a product.
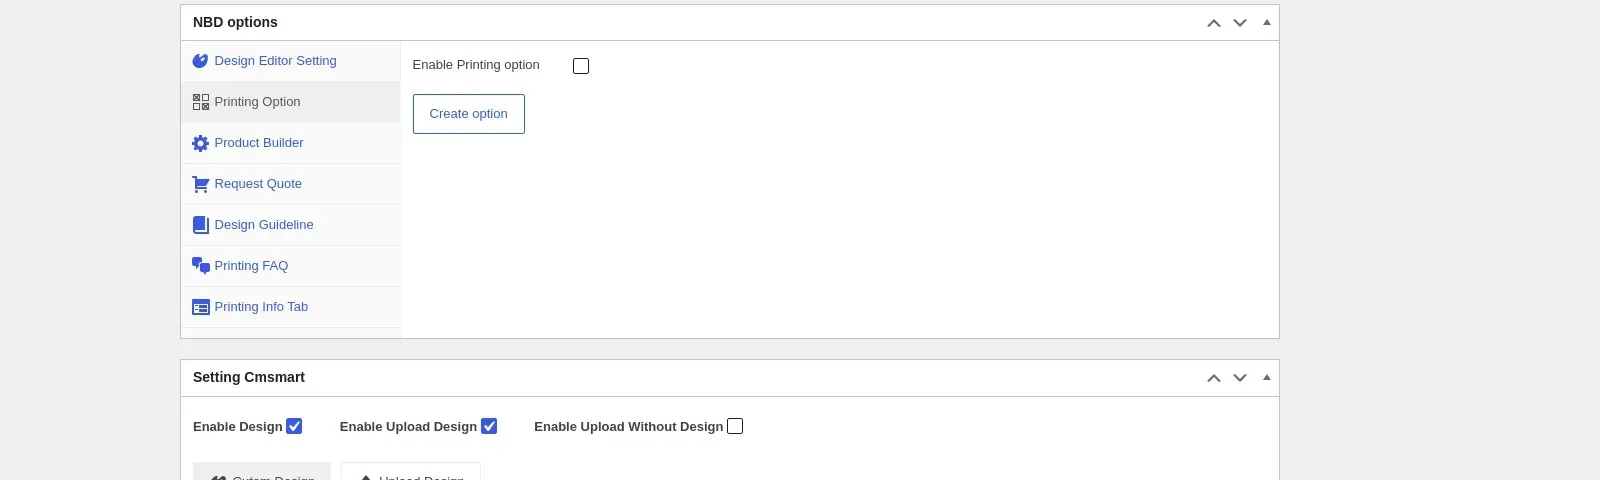
  2. In the Setting Cmsmart box tick Enable Design. Optionally tick Enable Upload Design and Enable Upload Without Design.
  3. Set the Product area and Design area (width, height, top, left) and the Design editor layout: Modern (recommended), Visual or Classic (deprecated).
  4. Update the product and open it on the storefront: a Start Design button opens the editor.
WooCommerce Edit product screen with the NBD options box and the Setting Cmsmart box showing Enable Design and Enable Upload Design ticked
The NBD options and Setting Cmsmart boxes at the bottom of a WooCommerce product edit screen.
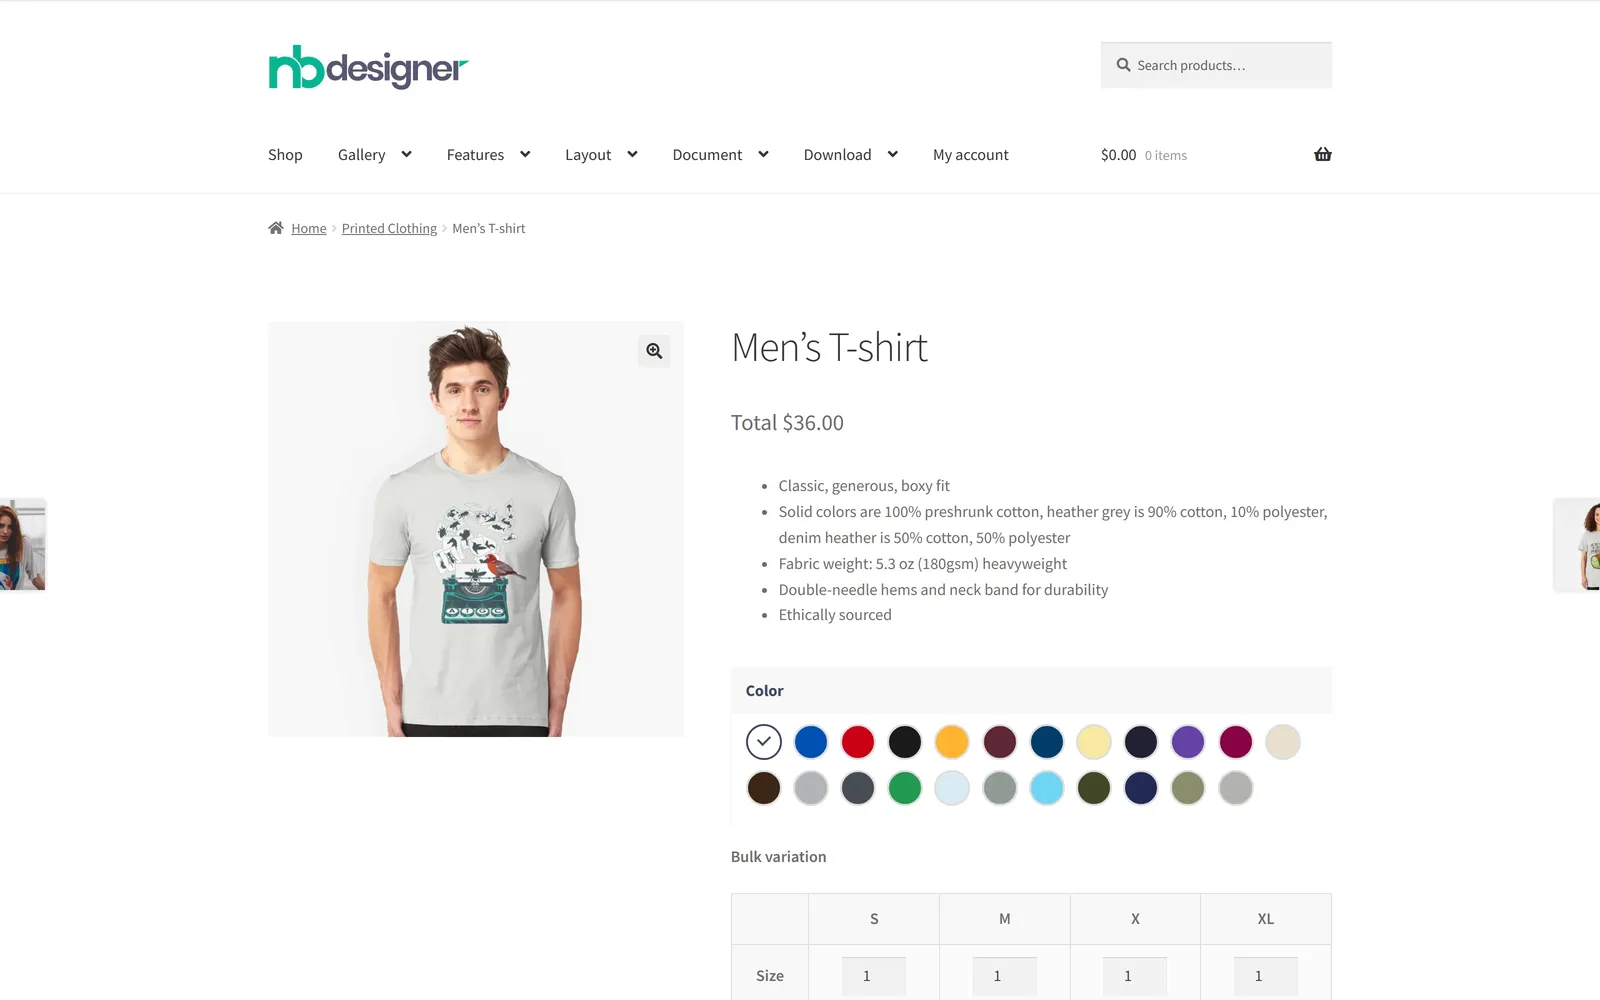
Men t-shirt product page on the NBDesigner demo with colour swatches and the design button
A product with design enabled on the NBDesigner demo store.
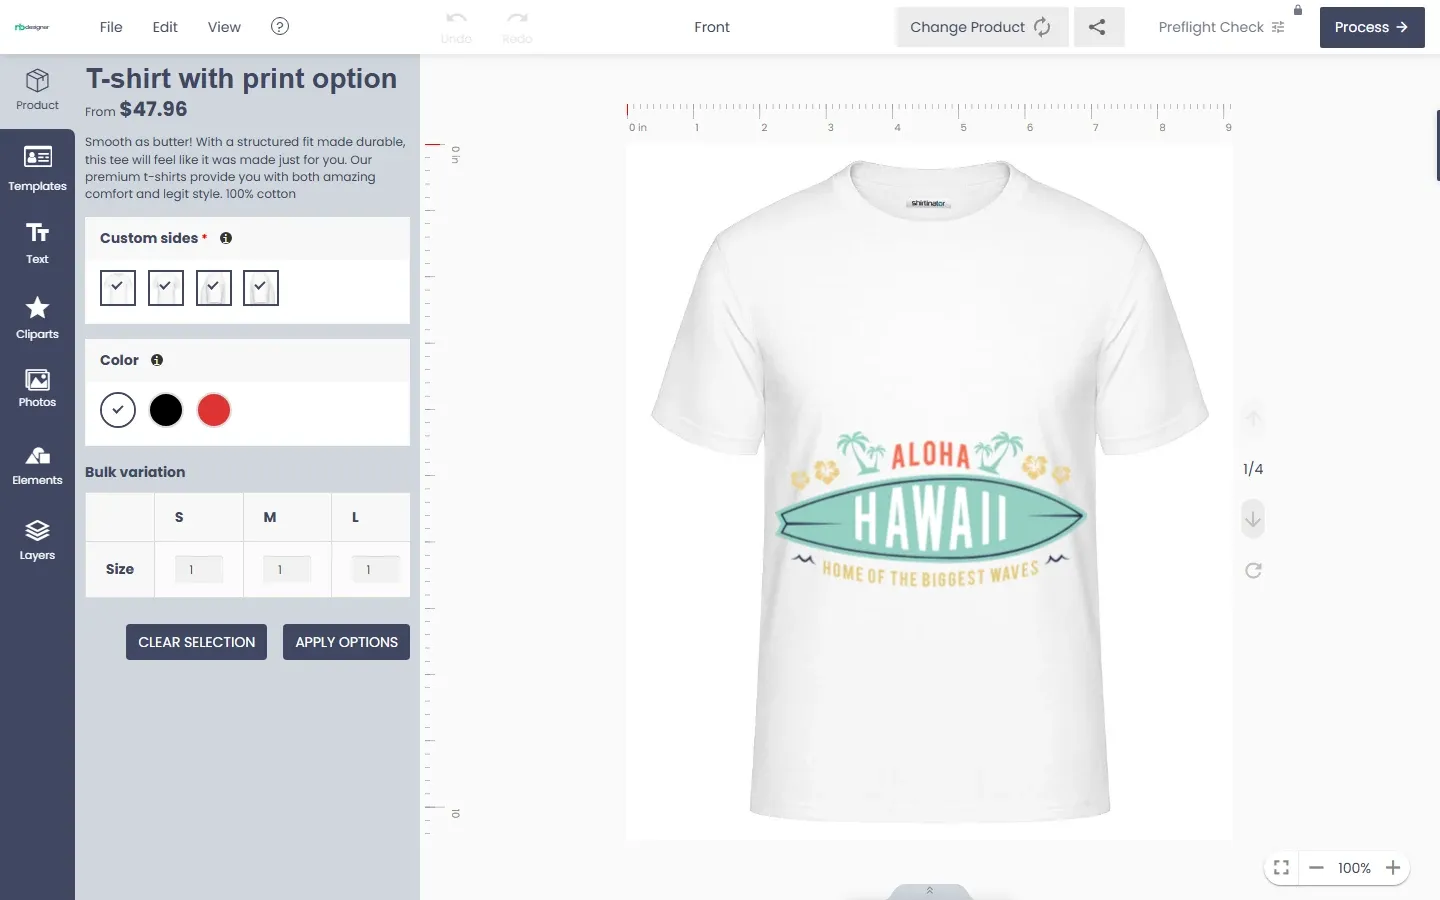
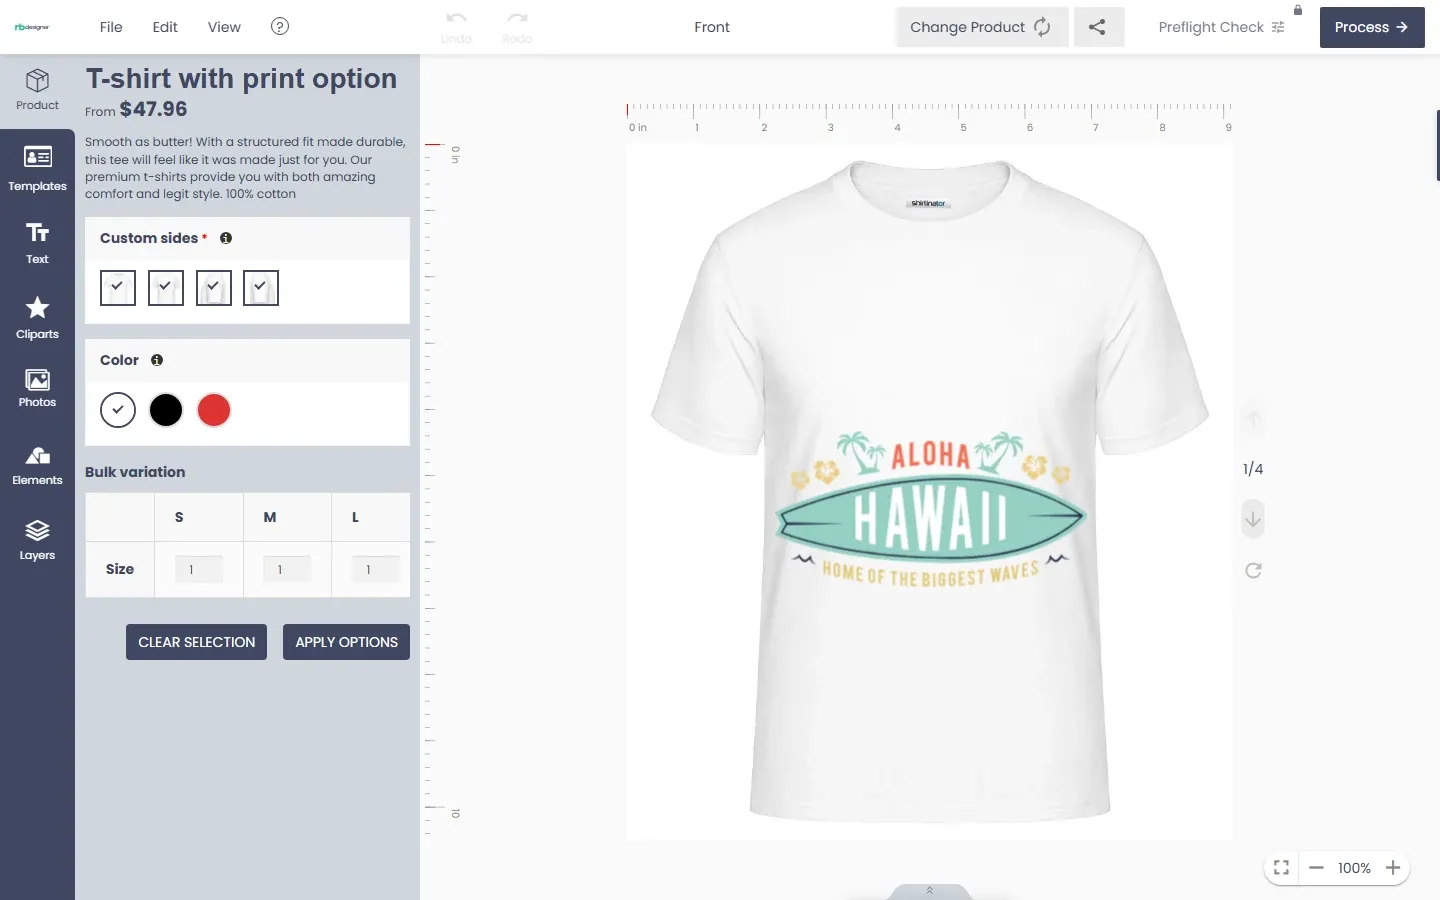
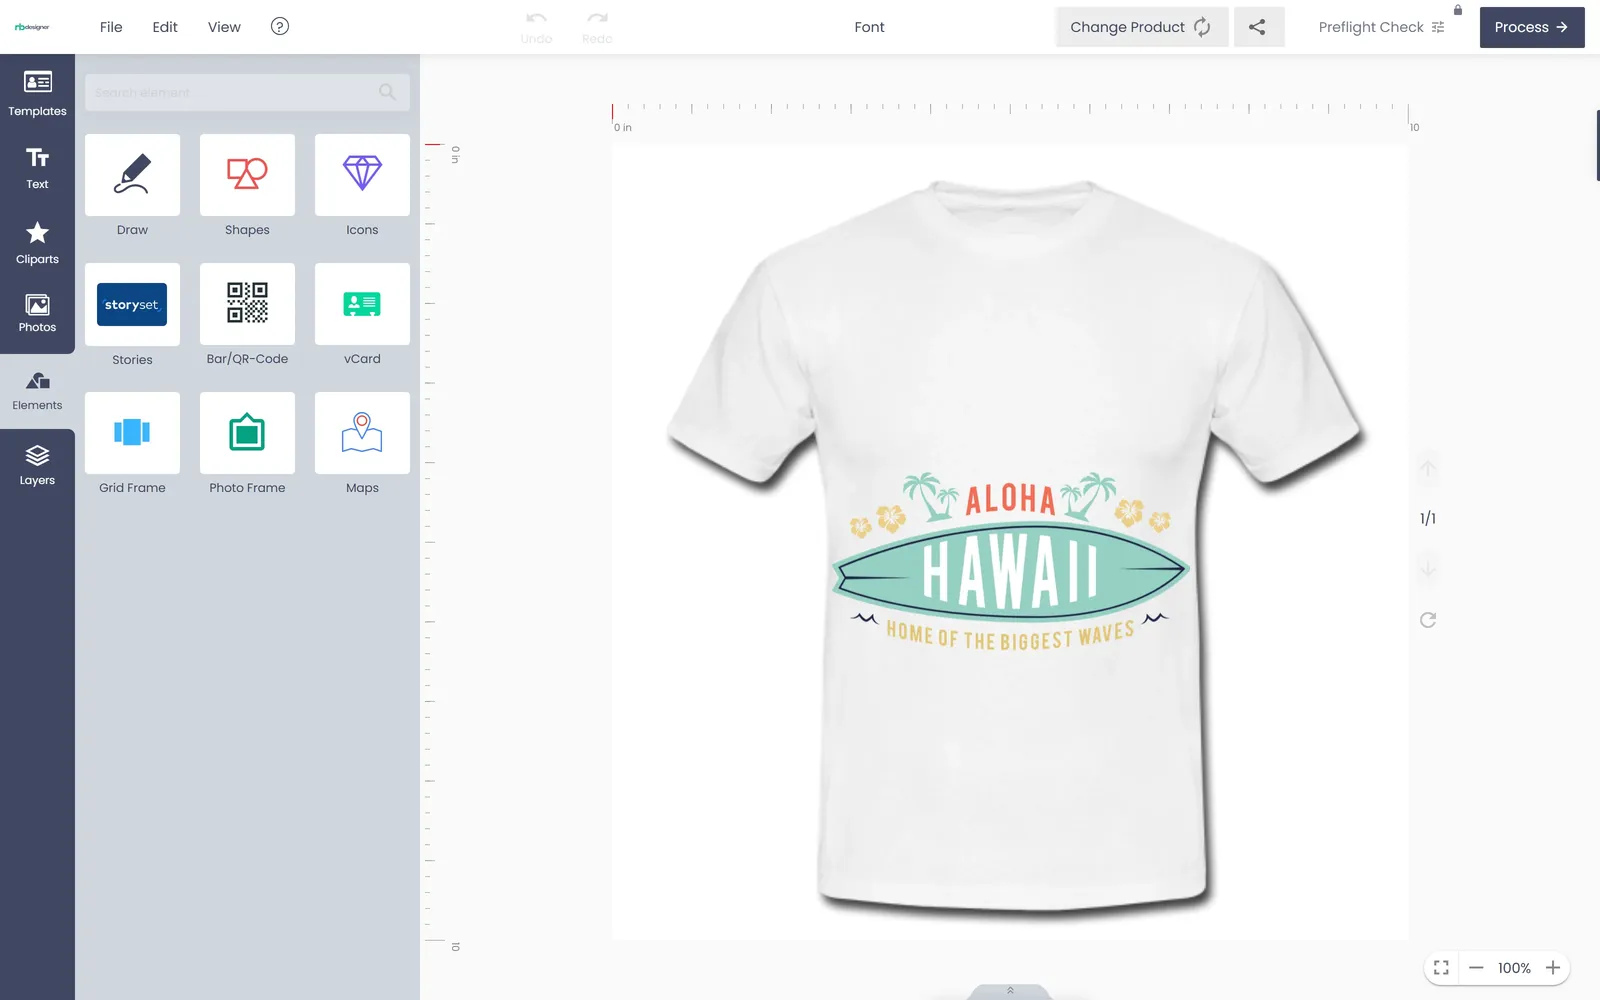
NBDesigner modern layout editor on a t-shirt with the left tool bar: Product, Templates, Text, Cliparts, Photos, Elements, Layers
The modern editor: left tool bar, Preflight Check and the Process button at the top.

Inside the editor customers get Templates, Text, Cliparts, Photos (Upload, Image url, Facebook, Instagram, Dropbox, Webcam, Pixabay, Unsplash, Pexels, Freepik), Elements and Layers. Which sources appear depends on your plan and your API keys in Cmsmart › Settings.

What if something does not work?

  • Warning about PHP max_input_vars on the Printing Options screen: raise max_input_vars in your PHP settings so large option groups save.
  • Warning about max_file_uploads in the product box: raise max_file_uploads so multi-side designs save.
  • JPG export needs the PHP Imagick extension; CMYK/ICC conversion needs Imagemagick with lcms2.
  • Nginx servers ignore .htaccess. The plugin writes script-blocking rules into its upload folders, so add an equivalent server rule on Nginx.
  • Status stuck on Expired or LITE after renewing: use Re-sync licence on the License page.

Frequently asked questions

Does NBDesigner work without WooCommerce?

No. WooCommerce is a declared required plugin, and the designer attaches to WooCommerce products.

Does it support HPOS order storage?

Yes. The order queries handle both High-Performance Order Storage and the legacy post store, and the Customer Design box loads on the WooCommerce Orders screen (fixed in 2.17.0).

Where do I find my license key?

In the email sent when you start the trial or buy, and in your Cmsmart Dashboard under Downloads & license key.

Which layout should I choose?

Modern. The plugin marks it recommended and has stopped adding features to Classic.

Try it on your store

Start the free 30-day trial from your Cmsmart Dashboard, see the WooCommerce product designer plugin page, or open the live demo. For custom print-shop projects, request a quote.

How to uninstall NBDesigner plugin NEXT

Dear our beloved customers,

Woocommerce online product designer plugin has been widely used to design and customize the products on your shop. With WooCommerce Online Designer, you are able to help customers draw their ideas on the products quickly by configuring online design for each product. Moreover, you can choose a suitable background with Image or Color or Transparent. It allows you to set up the design area and customers could only design on the overlay. Visit our live demo to know how it works. However, you could uninstall it if it isn't necessary for your business. In this article, we give you a way to do it. On top of this, we want to introduce you some features of our products. Let's take a look!

image_0.jpg

Some outstanding feature of NBdesign plugin 

  • A large number of Hotkeys: There are many hotkeys which help customers work faster
  • QR code: You can create QR code and then add to your design
  • Create PDF: Quickly create a PDF file from a design file
  • Powerful Layers: Drag and drop to sort layers and change layers of items.
  • Download customer's design file to SVG: You can download your customer's design file to SVG
  • Upload design: Allow customers to upload your own design with different types of file
  • Freehand drawing: Especially, you also can use many available brushes to draw, you can create your own signature.
  • Custom design: Admin can create one or more templates and manage them easily in the admin panel
  • Various Font: More than 600+ fonts are included in this product, so you can choose font styles as you want.
  • Import/Export design: Import or Export files directly from your source easier than ever 
  • Various Elements: There are 400+ shapes and 25,000+ icons available which you can express your feeling in the best way
  • Frontend translate with multiple languages: Customers can understand and design easily with multiple languages feature
  • Compatible with WooCommerce: This plugin is an extension of the WooCommerce plugin that allows your customer to design product easily
  • Customer design again easily: Customer can design the rejected file easily and send it back to the admin
  • Easy manage products with online: Products with online design feature on Front-end will be added on the checkbox to distingue with Products without online design feature
  • Easily manage order of customer: Admin can see the design in detail, accept/decline design, and send email feedback to customers
  • Export design to JPG high revolution, CMYK mode, and ICC profile: JPG with high revolution and CMYK mode is the best choice for print in most of the case. And you can create PDF files with them
  • Add/ curve text and 200+ typography: A customer can add text with various colors, fonts, and sizes. Especially, they can curve text in their design and edit anything. There are 200+ typography available which save your time to find
  • Add clip art: Customers can select images from different many sources as their computer, Url, Facebook, Instagram, Dropbox, Webcam or Pixabay and Unsplash. With 1.500.000 beautiful images, you can search and find the one you love.

Some instructions uninstall NBdesigner plugin:

  • Step 1: You click on box "plugins"  on Dashboard tool. And then you click on " installed plugin".
  • Step 2: Click on " Deactivate" of Nbdesigner.
  • Step 3: Click on box "Delete" of Nbdesigner.

After three steps, you could remove your plugin. And now, seeing the video below!

Follow this video below to uninstall Online design plugin!

How to uninstall Woocommerce product designer plugin?

We hope you find this article helpful. If you have any questions about your products, you could contact the information below or https://cmsmart.net/support_ticket/. We are always willing to answer all of your questions. Remembering to use coupon code MAR_DL to get 18% discount for this item. Many thanks!


NBDesigner Settings Guide: Every Tab Explained NEXT

Applies to Cmsmart Product Designer (NBDesigner) 2.17.0 — updated October 2026. Labels below are the real field names in Cmsmart › Settings.

In short

  • Settings live in Cmsmart › Settings with eight tabs: General, Appearance, Design Tool, Colors, Upload design, Output, Libraries and Printing Options.
  • Per-product choices (design area, layout, templates, bleed, DPI) are in the Setting Cmsmart box on the product edit screen.
  • The three settings most shops change first: Default output resolution - DPI, Allowed file types and Auto export design to PDF.

This is the reference for the WooCommerce product designer settings of the Cmsmart Product Designer (NBDesigner). It follows the tab order in the admin so you can open the screen and read along. Where a setting can also be set per product, that is noted.

NBDesigner modern editor open on a t-shirt, the result of the settings in this guide
The modern layout editor that the Appearance and Design Tool tabs configure.

General tab

General covers layout, units, resolution, saving, downloads and email. Sub-sections are General Settings, Notifications, Application, NBD Pages, Tools and Customization.

  • Default design editor layout: Modern (recommended), Visual or Classic (deprecated). You can override it per product.
  • Default output resolution - DPI: default 150; use 300 for print-quality artwork.
  • Dimensions Unit: cm, in, mm, ft or px.
  • Preview design size and Preview template size: thumbnail width in cart/order and in the gallery (default 300 px).
  • Hide design editor on smartphones, Allow save design for later, Allow share design, Cache latest design on user browser.
  • Allow customer re-design or re-upload design after order.
  • Allow download design after checkout and Allow download design in editor, with the file types the customer may download: PNG, PDF, SVG, JPG (CMYK needs PHP Imagick) and uploaded files.

Notifications

Admin notifications email you when a customer saves or changes a design (default Yes), with a Recurrence and Recipients. You can also Send mail to admins when approve designs and Attach custom designs to the notification as PNG, SVG or, since 2.16.0, Print-ready PDF. The Print-ready artwork emails setting controls the follow-up email when a PDF finishes after the order email and the alert when a render fails for good.

NBD Pages, Application and Tools

NBD Pages assigns Create your own page, Designer page, Gallery, Redirect login and Product builder page. Application holds the keys for external sources: Facebook App ID, Instagram App ID and Secret, Dropbox Chooser App ID, Google API key and Client ID, Pixabay, Unsplash, Pexels, Flaticon and Google Maps Static keys, and the Open AI key. Tools has Show upload image and background, Allow SVG uploads (sanitized), Enable log mode, Fix image URL after change domain, Fix lost images when export design into PDF, Render print PDFs in the cloud (on by default and visible since 2.17.0; choose “No, render on this server” to use your own server, and if a cloud render fails the server renders instead), Enable Cmsmart cloud api to export design into JPEG and PNG format and Site force login.

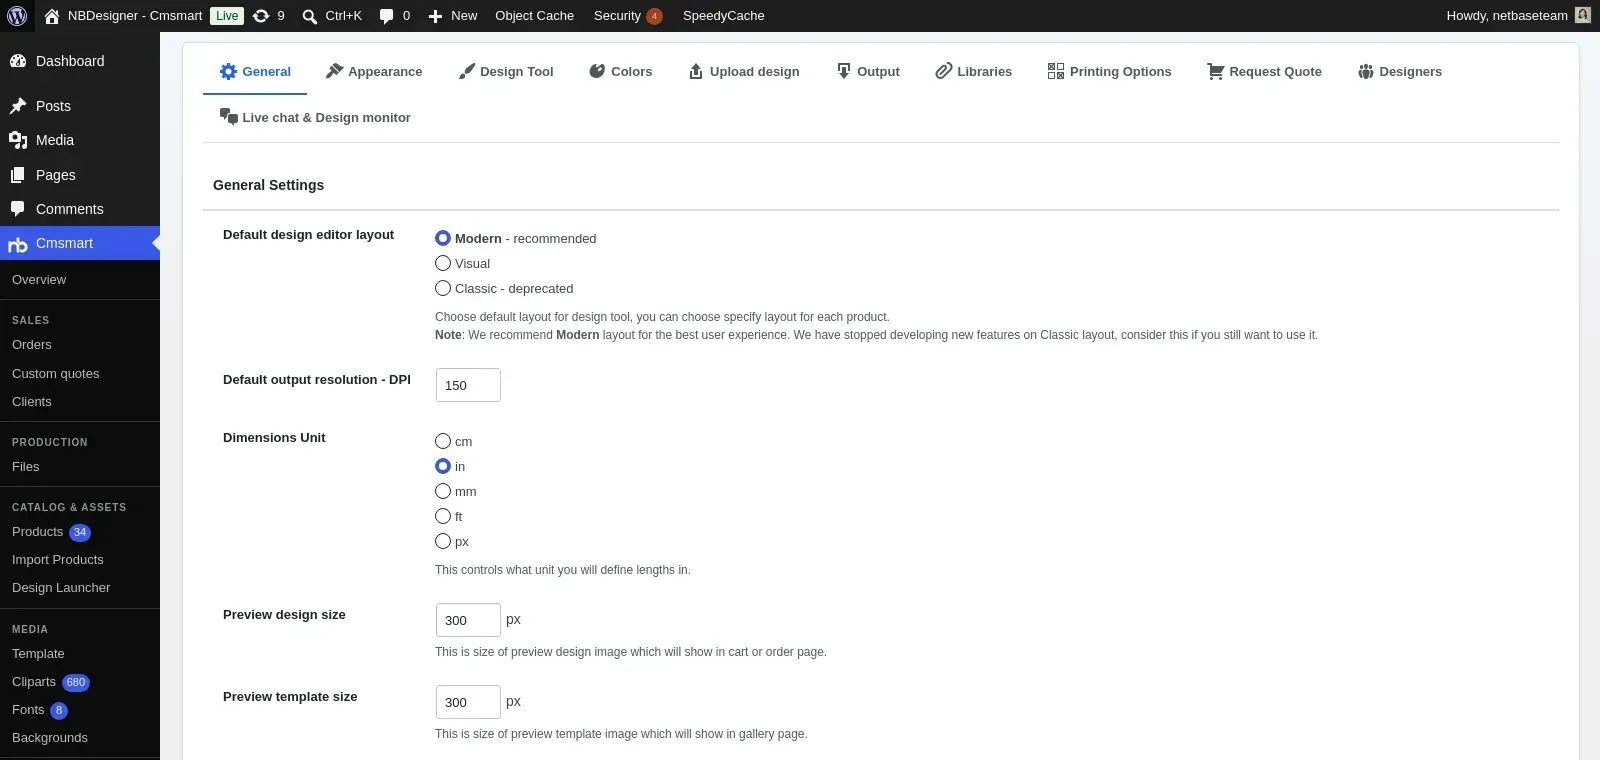
Cmsmart Settings General tab: Default design editor layout, Default output resolution DPI, Dimensions Unit, preview sizes
The General tab: layout, output DPI, units and preview sizes.

Appearance tab

Appearance controls how the editor looks and where the Start Design button appears. Sub-sections: Design editor, Modern layout, Product, Category, Cart/order/checkout and Misc.

  • Design editor: Show bleed, Show design area border, Hide Templates tab, Hide Elements tab, Hide Typography section, Hide manage layers tab, Show button change product, Display template mode, Logo.
  • Modern layout: Show cmsmart colorpallet, Show ruler, Show product dimensions, Show grid, Show layer dimension, Show warning out of stage, Show warning image low resolution.
  • Product: Show design tool (In product detail page or Open new page), Auto add to cart and redirect, Position of design button, Class for “Start design” button in product page, Hide button Add to cart before complete design.
  • Cart, order, checkout: Show customer design in cart and checkout, Show button edit design / re-upload file in cart and checkout, Show customer design in order.
  • Misc: Enable service “Lets design your artword for you”.
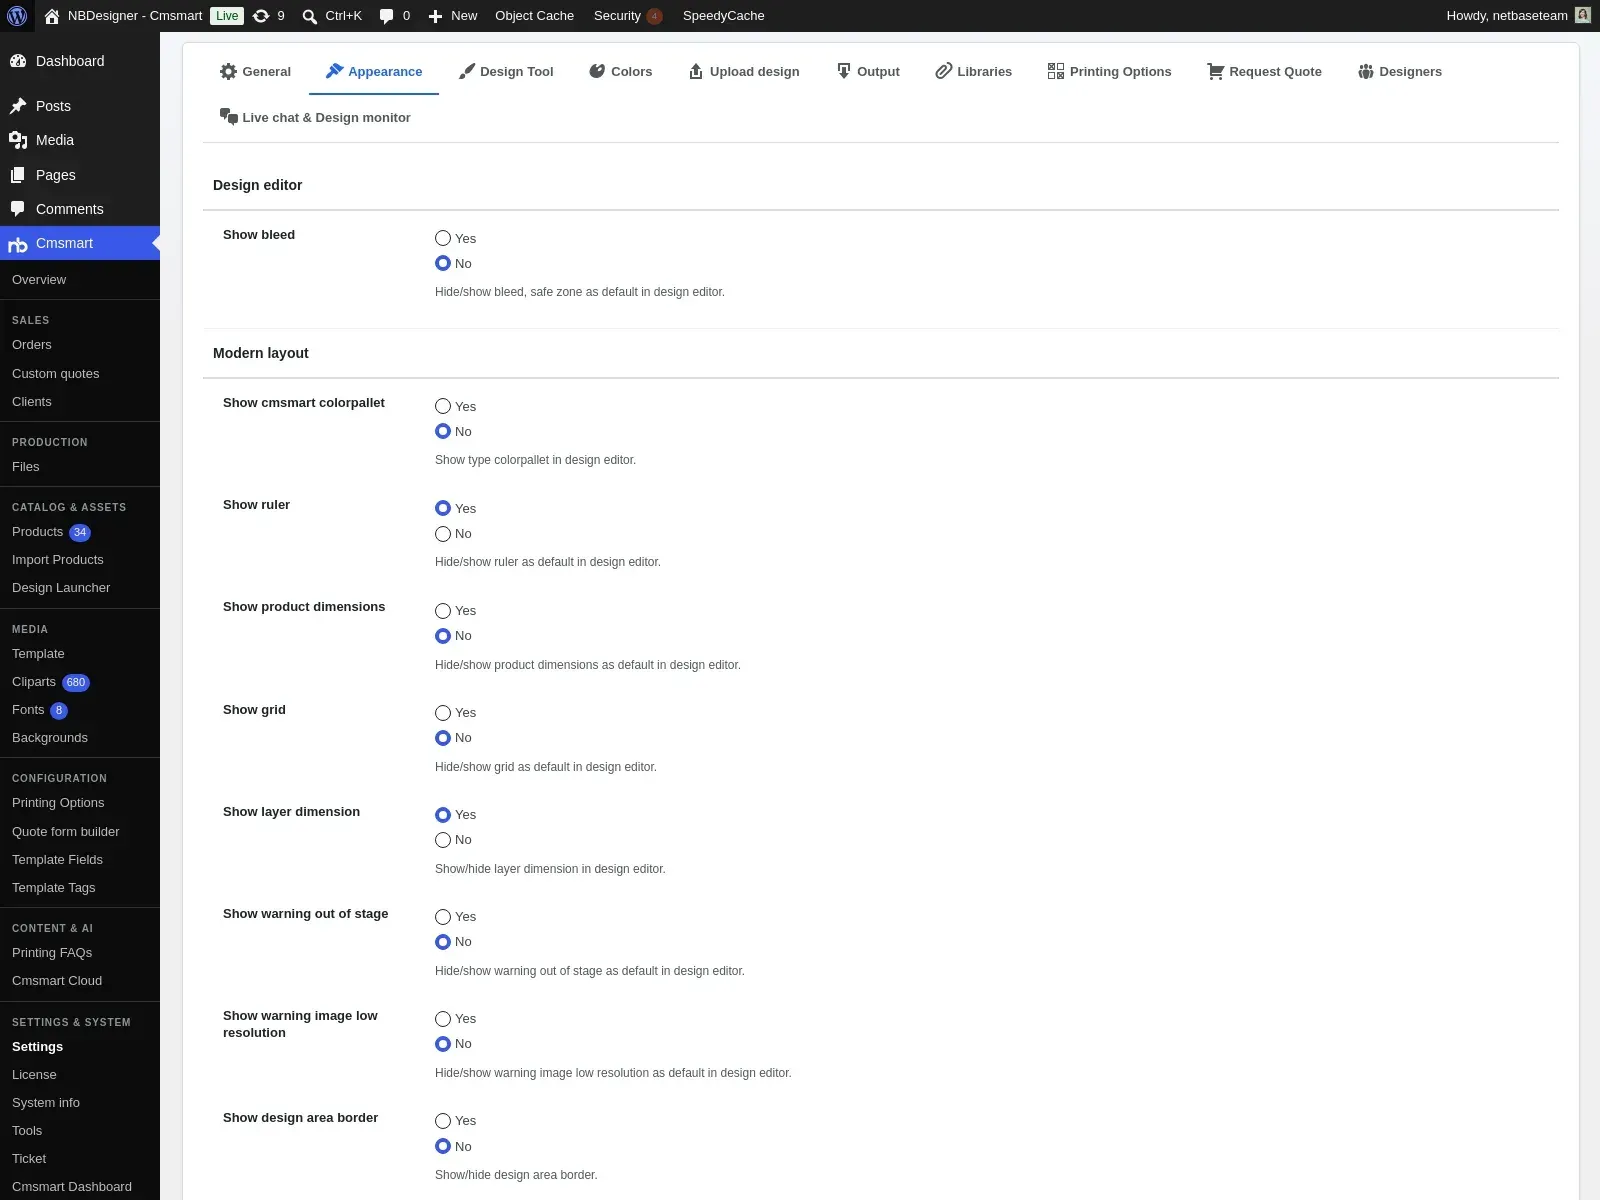
Cmsmart Settings Appearance tab: Show bleed, Modern layout options such as ruler, grid and layer dimension, warnings, tabs and logo
The Appearance tab: Design editor and Modern layout options.

Design Tool tab

Design Tool decides which tools customers get. Sub-tabs: Text Options, Elements Options, Image Options, Free draw Options, Qr Code Options and Misc.

  • Text: Enable tool Add Text, Default font subset, Enable check text language, Default text and color, Enable Curved Text, Enable Text transform unproportionally, default / minimum / maximum font sizes, Force min and max font size, Enable Text pattern.
  • Elements: Enable tool Add Clipart, Enable Cmsmart global clipart library, shapes, icons, Flaticon, Storyset, grid photo frame, photo frame and Google Maps Static (needs an API key).
  • Image: Enable upload image, Auto fit uploaded image with the stage, Login Required, multiple uploads, max upload files and size, Min image upload resolution, Enable low resolution image, images from URL, Google Drive, Pixabay, Unsplash, Pexels, Freepik, SVG code, webcam, Facebook, Instagram, Dropbox, image filters, and Show terms and conditions.
  • Free draw: Enable Free Draw. Misc: options such as Disable auto load primary template and Lazy load default template for heavy templates.
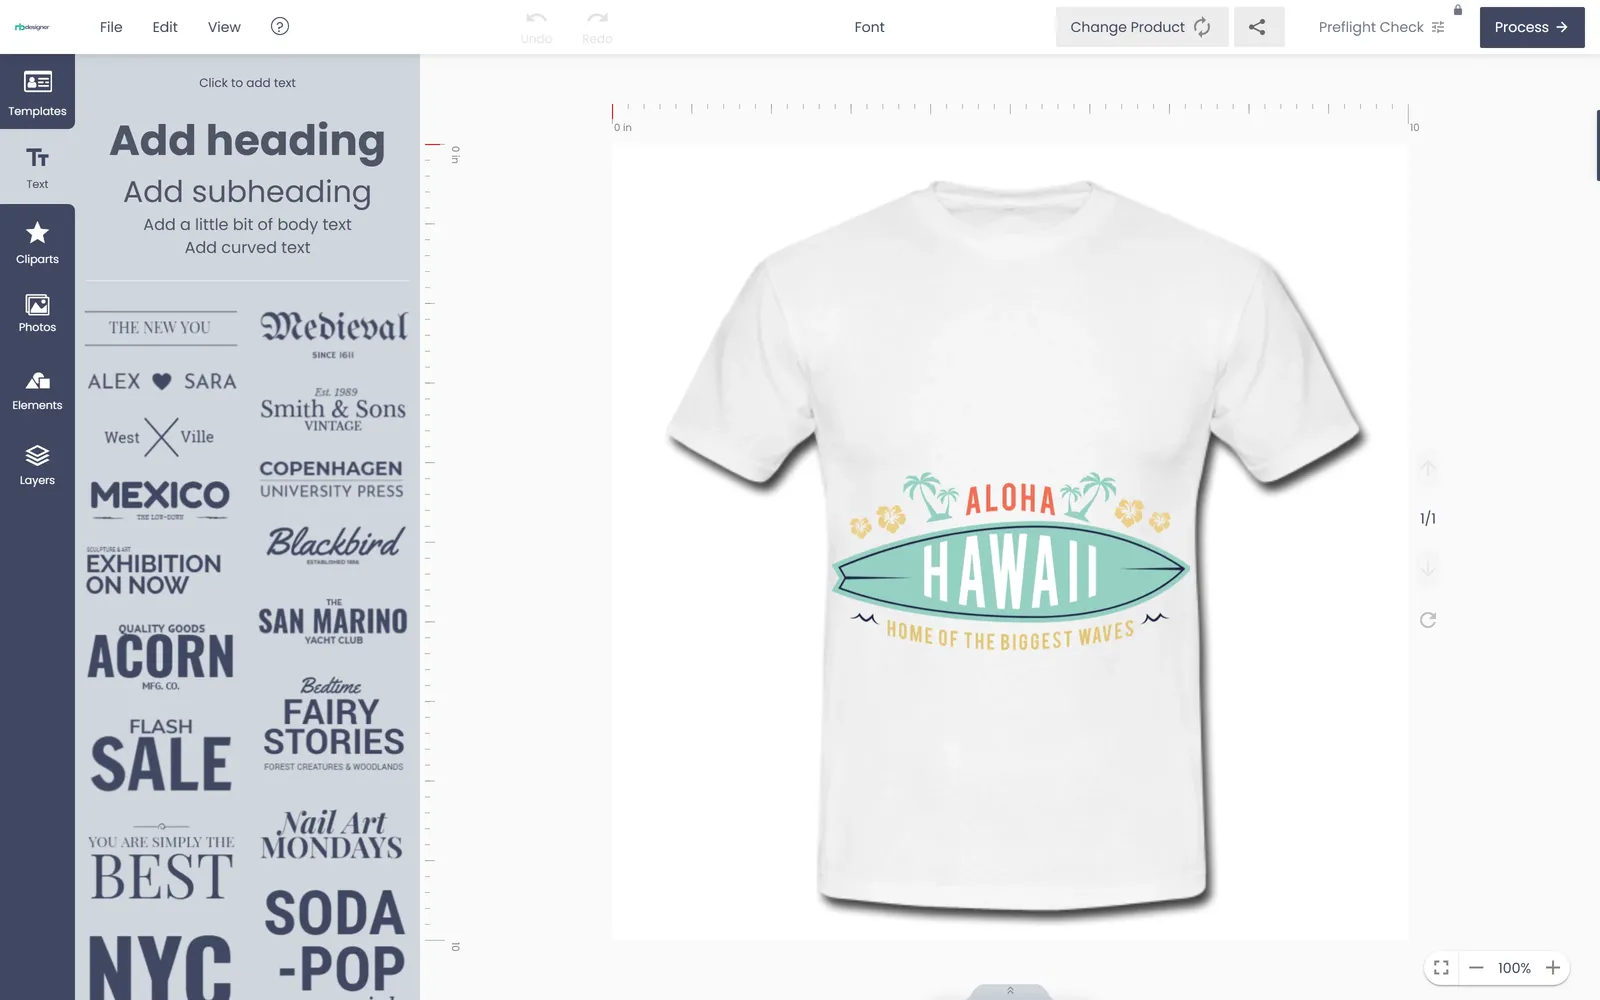
NBDesigner text panel with heading and subheading presets and font combinations
The Text panel customers see when Enable tool Add Text is on.
NBDesigner elements panel with draw, shapes, icons, QR code, vCard, maps and photo frame tools
The Elements panel: draw, shapes, icons, QR code, vCard, maps and photo frames.

Colors tab

Setting color has Show all color (full picker or only your palette), Hexadecimal Color Names and Enable color pick Eyedropper. Restricting the palette is the simplest way to keep customers inside your printable colours.

Upload design tab

Use it when customers upload their own artwork. Settings: Login Required, Allowed file types and Disallowed file types (comma-separated extensions, empty allows all), Max files uploads and Min files uploads, Max upload size and Min upload size, Create Preview for images and Preview image width, Min. resolution DPI for JPG/JPEG image, Upload file mode (Simple, or Advanced for photo frames and wallpaper), upload via Facebook, Instagram, Google Drive or Dropbox, and Delete upload files after X days. Details on resolution rules are in the DPI guide.

Output tab

Output decides what files you receive and where they go. Sub-tabs are Output general settings, Synchronize, JPG settings and SVG settings.

  • Watermark, Watermark type, image or text; Enable PDF password for customer and PDF password; Show bleed; Truetype fonts.
  • AI preflight is configured in Cmsmart Cloud › AI Tools (enable, required DPI, when it runs on orders).
  • Auto export design to PDF: since 2.16.0 it renders the print-ready PDF in the background when the customer clicks Process; Order status for auto export design (Completed, Processing or On Hold) re-checks it and renders again if the PDF is missing or out of date.
  • Also save print-ready PDFs in the pdfs folder (new in 2.17.0, off by default): copies each print-ready PDF into the design’s pdfs folder under the names Create PDF uses, for stores whose own code reads that folder.
  • Automatic synchronize output file to: No, FTP, SFTP, Dropbox, Amazon S3 or Google Cloud Storage, each with its own credentials. Some destinations show an Upgrade or Renew badge when your plan does not include cloud storage.
  • Default ICC profile for JPG (needs Imagemagick with lcms2) and Convert font to outlines for SVG (Beta).
Cmsmart Settings Output tab Synchronize section: Auto export design to PDF, Order status, Also save print-ready PDFs in the pdfs folder, and file sync destinations
Output › Synchronize: automatic PDF export and where output files are sent.

Libraries and Printing Options tabs

Libraries only toggles bundled scripts (perfect-scrollbar, Angular) for theme conflicts. Printing Options has General, Catalog, Cart, Order, Design editor and Admin manager sub-tabs for how option groups display; the group builder and price matrix are explained in the price matrix tutorial.

Product-level settings (Setting Cmsmart box)

On the product edit screen the Setting Cmsmart box holds what differs per product: Enable Design, Enable Upload Design, Product area and Design area sizes, Show cut line with bleed values, Show safe zone with margins, Design editor layout, Use templates and Use global template store, DPI, Dimensions unit, Extra price and Get a quote, Dynamic side, Allow user define demension, and Bulk variation. See the installation guide for the first product.

Frequently asked questions

Where are the NBDesigner settings?

In WordPress admin under Cmsmart › Settings. Per-product options are in the Setting Cmsmart box on the product edit screen.

Which layout is recommended?

Modern. Classic is deprecated and receives no new features.

How do I get print-ready PDFs automatically?

In Output, switch on Auto export design to PDF; the PDF is queued when the customer clicks Process. Add Print-ready PDF under Attach custom designs in Notifications to receive it by email.

How do I limit which file types customers upload?

Fill Allowed file types (and/or Disallowed file types) in the Upload design tab.

On the order artwork screen (2.17.0) a Print-ready PDF status shows Ready, Rendering, Failed or Not rendered, with the files and a Regenerate print-ready PDF button. The order screen’s Create PDF with its default settings now produces the same print-ready file as automatic export; changing paper size, margins, bleed lines, background or source builds a custom layout instead, which is not the print-ready file.

Try it on your store

Start the free 30-day trial from your Cmsmart Dashboard, see the WooCommerce product designer plugin page, or open the live demo. For custom print-shop projects, request a quote.

How to use Wordpress Online Design plugin in Frontend NEXT

How To Use Wordpress Online Design Plugin In Frontend

As you know, before deciding to buy a product, especially intellectual products such as software, we must always learn about how to use that product. However, with increasing demand, increasingly diverse customers, having a simple product easy to use and has many features that can be used immediately is extremely difficult. Therefore, before you buy products at CMSmart, we always try and provide the most detailed documentation, video guide for our customers, so that you can use the product simply and the easiest.

WordPress Online Design, as one of our the most outstanding products. The end-user will easily implement the design version she/he likes with our useful and easy-to-use feature. Besides, we also provide many tools to help the user get the quick steps to achieve the wanted features. Therefore, below are some detailed guidelines on using WordPress online design products that we would like to introduce to you. Here we go!

Design product with Woocommerce product designer plugin.

1. How to create a template?

  • First, how to go to the designer page? In the frontend, your customer can go to the designer page with some easy steps: Click "Start design" button, then access "Design Here Online"
  • Second, select a template you like to design

2. Insert and edit text on the template

  • Step 1: Move to Text Menu
  • Step 2: Select and click to add Text you like

Then, you can change the text color with document colors


Next, your customers can change the text font type they want.


3. Insert and edit clipart.

There are many interesting clip arts in WordPress online design that you can choose to insert for your design.

Step 1: Click the clipart menu and search: Enter the name of clipart to search.

Step 2: Click or drag&drop to add clipart.

Then, do you want to change color of clipart? Click your clipart on design, choose one color you like in document color.

4. Insert and edit the image.

How to insert a photo?

Step 1: Move to Photos menu

Step 2: Upload image

  • Way 1: You can upload files with "Image Upload" Button (Only accept file types have the file size from 0 Mb to 20 Mb)
  • Way 2: Use the image URL to insert Photos.
  • Another way: Insert photo in the image library.

5. Insert and edit the element.

Shape

Step 1, you move to the Element menu Custom Design Shapes. Then, you click or drag&drop to add shapes

Step 2, you can change the color of shape with document colors

Icons

Move to the Element menu and click "Icon" Button to insert Icon for your design. There are many Icons in the Icon library that you can choose.


Customize drawing with Draw Feature


6. Check the design

How can your customers check their designs in WordPress Online Design tool?

First: Go to your count -> view order

Click on the order number to view detail.

  • If display notification “Rejected! Click here to design again!”, the customer will design again.

check-the-design-1.png

  • If display notification “Approved!”, the customer’s designs are accepted.

check-the-design-2.png

Above is my introduction about "How to use Wordpress Online Design plugin in Frontend". I hope that this post, in my opinion, brought you some useful information. If you have any questions, please contact the Support Team or information below. If you want to know more about NB WordPress Design, you can try this product by access Live Demo or nbdesigner.cmsmart.net.

Do you want to receive coupon code from our promotion program? Please access promotion programs. Thank you for reading and keep following us to get more information in the next article! Bye, See you again!

Vincent
Sales Consultant Manager

Skype: live:vincent_4281
Phone/ WhatsApp: +84 355 993 306
Email: [email protected]

How to configure Print pricing option on NBDesigner? NEXT

NBDesigner-Product-Designer-Tool.png

The NBDesigner Plugin, developed by Cmsmart, is a cutting-edge solution tailored to meet the demands of Web-to-Print businesses. It empowers store owners to deliver unparalleled customization capabilities while simplifying pricing management. In the world of personalized products, transparency and flexibility in pricing are essential to winning customer trust and driving revenue.

NBDesigner allows businesses to configure dynamic print pricing options that align with customer needs and order specifications. Whether it’s tiered pricing for bulk orders or premium charges for intricate designs, this plugin offers a powerful and intuitive system to manage it all. In this guide, we’ll walk you through the process of configuring print pricing options and highlight how Cmsmart’s comprehensive solutions can elevate your Web-to-Print operations.

Why Print Pricing Options Are Crucial for Your Business

1. Customer-Centric Transparency

Clear pricing helps customers understand exactly what they are paying for, whether it’s based on order quantity, material choice, or additional customization. Transparent pricing builds trust and minimizes confusion during checkout.

2. Enhanced Revenue Opportunities

Dynamic pricing options enable businesses to maximize revenue by setting premium charges for advanced customization or offering discounts for larger orders, encouraging bulk purchases.

3. Competitive Advantage

Offering flexible and detailed pricing options demonstrates professionalism and customer focus, setting your business apart in a competitive market.

4. Operational Efficiency

Configuring precise pricing reduces errors during order processing, streamlining workflows and improving customer satisfaction.

Step-by-Step Guide: Configuring Print Pricing Options on NBDesigner

Step 1: Access the Printing Options Menu

  1. Log in to your WordPress admin dashboard.
  2. Navigate to NBDesigner > Printing Options in the left-hand menu.

Step 2: Define Quantity Breaks

1. Set pricing tiers based on the quantity ordered. For example:

  • 1–50 units: $15 each
  • 51–100 units: $12 each
  • 101+ units: $10 each

2. Enter these ranges and prices into the respective fields in the configuration panel.

Step 3: Add Descriptions for Pricing Tiers

  1. Use clear and concise language to describe each pricing tier.
    Example: “Order more than 100 units and receive a 15% discount on each item.”
  2. Descriptions ensure that customers understand the benefits of each option, improving the decision-making process.

Step 4: Configure Display Options

1. Choose how the pricing options will appear on your product pages. Options include:

  • Dropdown menus for compact views.
  • Radio buttons for quick selections.
  • Pricing tables for detailed comparisons.

2. Adjust the orientation and style to align with your website’s design.

Step 5: Save Changes and Preview

1. Click “Save Changes” to finalize your configurations.

2. Preview the product page to ensure that pricing options are displayed correctly and function as intended.

Step 6: Test Customer Experience

Simulate a customer purchase by selecting different pricing tiers to verify the accuracy and usability of your configurations.

For a comprehensive visual guide, explore our video tutorial How to Print pricing option on NBDesigner? 

for step-by-step assistance.

Tutorial video of Configure Print pricing option on NBDesigner

Key Features of NBDesigner for Pricing and Customization

Pricing Options could enable you to choose your printing styles. Therefore, if you want to display your prices to your shopper and any minimums, you need to add in to make ensure that a certain number is ordered. In addition, Customers are the direct users of products and services of the business and help your shopper make a profit for the business and play an important role in determining the survival of the business. Using pricing options can help customers have more choices in buying the products they want and help sellers increase prices and make profits when selling personalized products.

Dynamic Pricing Configurations

  • Create flexible pricing structures that adapt to customer preferences, including tiered pricing for bulk orders and premium charges for advanced customization.

Real-Time Design Previews

  • Customers can see live updates to both their designs and the associated costs, enhancing transparency and decision-making.

Customizable Display Options

  • Choose from various display formats to ensure compatibility with your website’s design and customer preferences.

Seamless Integration

  • Fully compatible with WooCommerce, making it easy to incorporate print pricing options into your existing eCommerce platform.

Multilingual Support

  • Serve global audiences effectively with multiple language options for the frontend interface.

About Cmsmart and Our Solutions for Web-to-Print Businesses

Who We Are

CMSmart-mobile-app-development-company.png

Cmsmart is a trusted leader in eCommerce innovation, offering tailored solutions for businesses across industries. With a focus on customization, scalability, and user experience, Cmsmart helps businesses achieve their goals and stand out in competitive markets.

Our Expertise in Web-to-Print Solutions

Cmsmart understands the unique challenges faced by Web-to-Print businesses, from managing complex pricing structures to delivering exceptional customer experiences. Our suite of solutions, including the NBDesigner Plugin, is designed to address these challenges and drive growth.

Solutions for Web-to-Print Businesses

  1. NBDesigner Plugin: Simplifies product customization and dynamic pricing management.
  2. Advanced Order Management Tools: Streamlines backend operations with features for reviewing, approving, and managing custom designs.
  3. Custom Design Features: Offers tools like freehand drawing, typography options, and clip art libraries for unique and engaging designs.
  4. Global Accessibility: Multilingual and mobile-responsive solutions ensure your store caters to a diverse audience.
  5. Scalable for Growth: Whether you're a small business or an enterprise, our tools grow with you, ensuring seamless operations at every stage.

Explore more about our offerings at Cmsmart.net.

Why NBDesigner is the Best Choice for Your Business

The NBDesigner Plugin isn’t just a tool—it’s a comprehensive solution designed to elevate your Web-to-Print operations.

Top Benefits

  1. Enhanced Customer Experience: Intuitive design tools and transparent pricing create a seamless shopping journey.
  2. Increased Profitability: Dynamic pricing structures enable businesses to maximize revenue from bulk orders and premium customizations.
  3. Efficient Workflow Management: Reduce errors and improve order processing with precise configurations and advanced backend tools.
  4. Global Compatibility: Multilingual and responsive design ensures accessibility for customers worldwide.

Experience NBDesigner Today

Try Our Demo

Experience the full capabilities of the NBDesigner Plugin by visiting our LIVE DEMO.

Exclusive Offer

Use coupon code MAR_DL to receive an 18% discount on your purchase of the NBDesigner Plugin.

Get Support Anytime

Our dedicated team is ready to assist you with setup, customization, and optimization. Contact us today to take your Web-to-Print business to the next level with Cmsmart and NBDesigner!

Explore the features of NBdesigner with our live demo here: Demo Link. This tool is designed to provide the perfect solution for your website with its advanced capabilities.

If you have any inquiries or require assistance, don’t hesitate to leave a comment or reach out directly. Cmsmart's team are willing to help you!


How to configure DPI and where does it display on NBdesigner? NEXT

How to configure DPI and where does it display on NBdesigner.jpg

Dear our beloved customers,

This is the powerful tool of Web to Print stores. It is very useful for both printing shop owner and their customers. The free Media library is available on WooCommerce Online Designer Plugin and printing functions are the outstanding features compared to our competitors. NBdesigner is built for all types of printing company which helps customers draw their idea in the fastest way.

What is DPI?

DPI stands for ‘dots per inch’ – the number of printed dots there is in an inch of the printed document. DPI is used to describe the resolution number of dots per inch in a digital print and the printing resolution of a hard copy print dot gain, which is the increase in the size of the halftone dots during printing. This is caused by the spreading of ink on the surface of the media. The larger the DPI and the number of dots, the clearer the print is. In addition, with much more DPI, the level quality of the print would be higher. Most of the prints often opt for the resolution with DPI between 300 and 600. However, professional photography or large advertisements might be print at a very high DPI like 1200.

what-is-dpi.png

Configure and Display DPI?

  • Firstly, You need to log in to NBDesigner - Cmsmart, add file and enter information in the Backend. In "general" box, changing " fixed amount'  into "Current value price" and increasing "additional price" from 0 to 0.01.
  • Secondly, you do not need to change something inbox "conditional", "appearance" and "online design".
  • And then, click on Update and view in Fronted.

Now, you can correct DPI as you like. Pressing the button " start and update design" and enjoy your product. Besides, Cmsmart creates a video for you to know more details, please watch this below video!

How to configure DPI and where does it display on Woocommerce product online design plugin? 

I wish this article helped you fully understand the way configure DPI and where it displays. If you need any help figuring out, please feel free to contact us at CMSmart Support team We are always willing to help you. If you have any questions, please contact Mr. Vincent. He will answer your question. Using coupon code MAR_DL to get 18% OFF for this item. Discover detail product here: LIVE DEMO

Many thanks and best regard!

View more: How To Configure Area Design Shape And Where Does It Display?

Vincent
Sales Consultant Manage

Skype: live:vincent_4281
Phone/ WhatsApp: +84 868 901 261
Email: [email protected]

How to setup Visual Design editor layout in Woocommerce product designer plugin? NEXT

how-to-set-up-visual-design-editor-layout-in-woocommerce-product-designer-plugin.jpg

Why should you choose one layout over another?

Why you should carefully make a selection when choosing one layout on your website:

A good layout keeps users on the site because it makes important information easily accessible and intuitive to find. A bad layout frustrates users which then quickly leave the site because they can’t find what they are looking for. For this reason, it’s best to take as long as you need to find a good layout because users won’t give you more than a few seconds of their time. There’s a strong relationship between the layout and the engagement of users with the website. It determines how long they dwell on the website pages, how many pages they browse and how often they come back to the website. So, besides overcoming the problem of split-second choice, a good layout comes with additional benefits. Engaging visitors can be a rewarding effort.

Some highlight features of NBDesigner plugin you might concern: 


  • A large number of Hotkeys: There are many hotkeys which helps customers work faster
  • QR code: You can create QR code and then add to your design
  • Create PDF: Quickly create a PDF file from a design file
  • Powerful Layers: Drag and drop to sort layers and change layers of items.
  • Download customer's design file to SVG: You can download your customer's design file to SVG
  • Upload design: Allow customers to upload your own design with different types of file
  • Freehand drawing: Especially, you also can use many available brushes to draw, you can create your own signature.
  • Custom design: Admin can create one or more templates and manage them easily in the admin panel
  • 100% responsive & mobile friendly: Customers can design on any device such as desktop, tablet or mobile
  • Social sharing: Share your design via social channels such as Facebook, Twitter, Google+
  • Various Font: More than 600+ fonts are included in this product, so you can choose font styles as you want.
  • Import/Export design: Import or Export files directly from your source easier than ever 
  • Easy to use: Admin can use this product easily. Especially, it is very friendly with customers and simple to use
  • Various Elements: There are 400+ shapes and 25,000+ icons available which you can express your feeling in the best way
  • Powerful help tool: Especially, you also can use many available brushes to draw, you can create your own signature
  • Frontend translate with multiple languages: Customers can understand and design easily with multiple languages feature
  • Compatible with WooCommerce: This plugin is an extension of the WooCommerce plugin that allows your customer to design product easily
  • Customer design again easily: Customer can design the rejected file easily and send it back to the admin
  • Easy manage products with online: Products with online design feature on Front-end will be added on the checkbox to distingue with Products without online design feature
  • Easily manage order of customer: Admin can see the design in detail, accept/decline design, and send email feedback to customers
  • Flexible config: You can set size upload, preview thumbnail size, thumbnail quality, show customer design in the cart, show customer design in order, admin notifications, and so on
  • Export design to JPG high revolution, CMYK mode, and ICC profile: JPG with high revolution and CMYK mode is the best choice for print in most of the case. And you can create PDF files with them
  • Add/ curve text and 200+ typography: A customer can add text with various colors, fonts, and sizes. Especially, they can curve text in their design and edit anything. There are 200+ typography available which save your time to find
  • Add clip art: Customers can select images from different many sources as their computer, Url, Facebook, Instagram, Dropbox, Webcam or Pixabay and Unsplash. With 1.500.000 beautiful images, you can search and find the one you love

How to setup Visual Design editor layout in Woocommerce product designer plugin?

As you could see, we provide 3 design editor layouts for your choices. Customer can design online on the product detail page and Admin can set it for all products You also could choose the design editor layout for each product. 

Today, this article will show you how to setup Visual Design editor layout in  NBDeisgner plugin. Kindly follow this tutorial video for more detail: 

We hope you find this article helpful for your business. If you want to find more detailed information about our NBDesigner, kindly go to WOOCOMMERCE PRODUCT DESIGNER PLUGIN. If you have any questions about this product, please contact our Sales Consultant Manager, Vincent or CMSmart Support Team. He will answer all your questions. Don't forget to use coupon code MAR_DL to get 18% Discount for this item. Many thanks!

View Demo: NBDesigner Demo

Vincent
Sales Consultant Manager

Skype: live:vincent_4281
Phone/ WhatsApp: +84 355 993 306
Email: [email protected] 

How to Use global template store in Woocommerce product designer plugin? NEXT

Use global template store in WordPress NBdesigner.jpg

Have you tried the WordPress Online Design Plugin? If you haven't tried, please contact Mr.Vincent to receive WordPress Online design Free Version. If you have tried and you like this Plugin, I will tell you more about it. Because CMSmart will constantly update the new features of this product for you. You and your print shop will always experience new things with us. In this article, I will introduce the Global Template Store and How To Use Global Template Store in Woocommerce Product Designer Plugin. Here we go!

Global Template Store

You installed WordPress Online Design Plugin on your Printing Website. Your customers can use the online design feature. However, when they go to the product and click "start upload and design" -> "Here design online" and see Design interface. You and your customers only see the design features of the product. There aren't available templates like our DEMO. All the available templates we have prepared for WordPress Online Design are called Global Template Store. So, how to show templates with Global Template Store?

Use the Global Template Store in Woocommerce Product Designer Plugin

  • Step 1: You go to Backend -> Click Product -> Choose "Enable use template"
  • Step 2: You click "use global template store" -> choose the template type that you want. You can view list template
  • Step 3: Update your change
  • Step 4: Final, you go to Frontend and check your template in Woocommerce Product Designer Plugin. Now, you will have beautiful templates like Our DEMO

If you want more detail, please follow this simple video guide step by step.

How to Use a global template store in the Woocommerce product designer plugin? 

Above is some information and user guide Global Template Store in Woocommerce Product Designer Plugin. I hope this article brought a few helpful shares for you. If you have any questions please contact Mr. Vincent or Support team. Remembering to use coupon code MAR_DL to get 18% OFF for this item.

Thank you for reading and keep following us to get more information in the next article! Bye, See you soon!

Vincent
Sales Consultant Manager

Skype: live:vincent_4281
Phone/ WhatsApp: +84 355 993 306
Email: [email protected]


How to create Component in Product builder of NBDesigner? NEXT

Do You Need a “Product Builder” for Your Online Store?

In the competitive realm of e-commerce, offering personalized product customization is not just a value-add; it’s a strategic advantage. The NBDesigner plugin, developed by Cmsmart, is a state-of-the-art solution that brings seamless product customization to WooCommerce stores. Designed with businesses and customers in mind, NBDesigner combines advanced features with an intuitive interface to create a highly engaging and efficient customization experience.

Cmsmart’s NBDesigner plugin is a cutting-edge product builder that empowers e-commerce businesses to provide seamless customization experiences for their customers. Packed with advanced features and designed for effortless integration with WooCommerce, NBDesigner is the ultimate solution for businesses looking to offer personalization while optimizing operational efficiency.

What Is a Product Builder?

A Product Builder is an interactive tool that allows customers to personalize products directly on your e-commerce website. It provides a live preview of the design, enabling users to adjust elements like colors, fonts, images, and text to create a product that meets their unique requirements.

Key Functions of a Product Builder:

  • Personalization Options: Customers can modify various aspects of a product, such as size, color, graphics, and text.
  • Interactive Experience: Live previews enable users to see changes in real time, enhancing their confidence in the purchase.
  • Streamlined Customization: Customers can design products without needing support from customer service, reducing time and effort for both parties.

Why Your Online Store Needs a Product Builder?

In the fast-paced, customer-centric world of e-commerce, standing out from the competition requires more than offering quality products. It demands engaging, interactive shopping experiences that cater to individual preferences. A Product Builder is a transformative tool that can help achieve these goals by empowering customers to design and personalize products. Its ability to enhance customer experiences, boost engagement, and increase sales makes it a valuable addition to any online store. Here’s an in-depth look at the specific ways a Product Builder can drive your e-commerce success.

Empowering Customer Creativity

Empowering-Customer-Creativity.jpg

A Product Builder gives customers the freedom to take charge of the product design process. By enabling them to personalize items with their own choices—such as colors, graphics, and text—it turns shopping into a creative experience.

How It Works

Imagine a customer searching for a custom phone case. With a Product Builder, they can:

  • Select a base color for the case that aligns with their style.
  • Upload an image or artwork that holds personal significance.
  • Add a personalized message using their preferred font, size, and alignment.

This process fosters creativity, allowing customers to craft products that feel uniquely theirs. It transforms the act of shopping from a transactional activity into a personalized journey.

Why It Matters

This freedom to customize not only enhances the user experience but also instills a sense of ownership in the final product. Customers who are actively involved in creating their items are more likely to cherish them and share their experience with others, amplifying your brand’s reach through word of mouth.

Real-World Insight

According to a Deloitte study, 36% of consumers are interested in purchasing personalized products, and 48% are willing to wait longer for customized items​.

Enhancing User Engagement

Customer engagement is a critical metric for any e-commerce store. Interactive features, such as a Product Builder, encourage customers to spend more time exploring your website, experimenting with design options, and visualizing their ideal product.

The Engagement Advantage

Unlike static product pages, a Product Builder actively involves customers in the shopping process. Each design choice—whether it’s adjusting a font, selecting a pattern, or layering elements—adds a layer of interaction that keeps users engaged.

The Proven Impact

Research highlights the effectiveness of interactive tools in boosting engagement:

  • E-commerce websites with product builders experience a 25% increase in customer engagement.
  • The average session duration improves by 15%, as customers spend more time crafting their perfect product​​.

Additional Benefits

Engaged customers are also more likely to:

  • Explore other product categories while customizing their items.
  • Share their experience with friends or on social media, driving organic traffic to your store.

Increasing Sales and Revenue

Beyond improving user engagement, a Product Builder has a direct and measurable impact on your store’s bottom line. By simplifying the decision-making process and streamlining the path to purchase, it encourages conversions and increases revenue.

How It Drives Revenue

1. Upselling Opportunities

Upselling-Opportunities.jpg
A Product Builder provides a natural platform for upselling premium features. Customers customizing their items are more likely to explore and invest in:

  1. High-quality materials.
  2. Exclusive design elements like custom fonts or intricate patterns.
  3. Add-ons such as protective coatings or gift wrapping.

2. Higher Conversion Rates

Higher-Conversion-Rates.jpg
By offering an intuitive, seamless design process, a Product Builder reduces friction in the buying journey. Customers can visualize their creation in real time, eliminating doubts and hesitation that often lead to cart abandonment.

3. Reduced Returns

Reduced-Returns.jpg
Allowing customers to preview their designs minimizes the risk of dissatisfaction. Shoppers are less likely to return items when they’ve been actively involved in crafting them, reducing costs associated with returns and refunds.

4. Building Brand Loyalty

Building-Brand-Loyalty.jpg

One of the most profound benefits of a Product Builder is its ability to foster long-term customer loyalty. When customers design their own products, they create not just an item but a personal connection to your brand.

5. The Emotional Investment

The-Emotional-Investment.jpg

This sense of ownership goes beyond the tangible product. Customers feel pride in their creation and associate that positive emotion with your business. This emotional connection translates into:

  • Increased Repeat Purchases: Satisfied customers are more likely to return to your store for future purchases.
  • Brand Advocacy: Happy customers become brand ambassadors, recommending your store to friends and family.

Real-World Example

Consider a customer who designs a personalized t-shirt with a meaningful quote. Each time they wear it, they’re reminded of the enjoyable experience they had on your website. This creates a lasting impression that builds trust and loyalty to your brand.

The Bigger Picture

Benefit-of-Product-Builder.jpg

The integration of a Product Builder into your e-commerce store is more than just a feature upgrade—it’s a strategic investment in your business’s growth and customer satisfaction.

  • For Customers: It provides an engaging, creative, and fulfilling shopping experience.
  • For Businesses: It drives key metrics, from engagement and conversions to revenue and customer retention.

As personalization continues to dominate consumer preferences, a Product Builder positions your store as a leader in innovation and customer-centric service. By offering shoppers the tools to express themselves, you create a win-win scenario that benefits both your customers and your brand.

Next Steps: Explore how Cmsmart’s NBDesigner plugin can bring this transformative experience to your e-commerce store. With advanced features and seamless WooCommerce integration, NBDesigner empowers you to deliver exceptional personalization capabilities while streamlining your operations. Let your customers design their own story with your products—and watch your business grow in return.

Cmsmart’s NBDesigner Plugin: The Ideal Product Builder Solution

NBDesigner-Product-Designer-Tool.png

The NBDesigner plugin, developed by Cmsmart, is a powerful tool designed to bring seamless product customization to WooCommerce stores. With its advanced features and intuitive interface, NBDesigner enables businesses to offer highly personalized products while maintaining operational efficiency.

Getting Started with NBDesigner

  1. Install the Plugin: Add NBDesigner to your WooCommerce store.
  2. Define Customization Options: Set up elements such as fonts, shapes, and templates.
  3. Enable Real-Time Previews: Allow customers to visualize their designs instantly.
  4. Manage Orders Easily: Review, approve, or request changes to customer designs through the admin panel.

Highlight Features of NBDesigner

NBDesigner is equipped with a comprehensive suite of features that cater to both customers and store owners. Below is an in-depth look at its standout capabilities:

Customer-Focused Features

Advanced Customization Tools

  • Hotkeys: Speeds up the design process, enabling users to work more efficiently.

  • Freehand Drawing: Customers can draw directly on the product using various brushes, allowing them to add personal touches like signatures.

  • Curve Text and Typography: Offers 200+ typography styles, including curved text, to create unique designs.

Extensive Resources

  • Clip Art and Icons: Access to over 1.5 million images and 25,000 icons from platforms like Pixabay and Unsplash.
  • QR Code Generator: Customers can create and add functional QR codes to their designs.
  • Font Library: Includes more than 600 fonts, catering to diverse preferences and design styles.

Responsive and Mobile-Friendly

Responsive and Mobile-Friendly-1.jpg

NBDesigner works seamlessly across all devices, including desktops, tablets, and smartphones, ensuring accessibility for every customer.

Social Sharing

Social-Media-Sharing.jpg

Customers can share their designs on social platforms like Facebook, Instagram, and Twitter, increasing brand exposure and engagement.

Admin-Focused Features

Order Management

  • View detailed customer designs, approve or decline orders, and request revisions directly from the admin panel.
  • Easily manage and track orders with customizable status notifications.

Custom Templates

Admins can create and manage templates for popular products, making it easier for customers to start their designs.

Export Options

  • Export designs in high-resolution formats like JPG, SVG, or PDF.
  • Print-ready outputs, including CMYK mode and ICC profiles, ensure professional-quality results.

Flexible Configuration

Adjust settings such as file upload limits, thumbnail preview sizes, and notifications to suit your business needs.

Additional Features of NBDesigner

  • Layer Management: Drag and drop layers to organize and modify designs efficiently.
  • File Import/Export: Simplifies the process of managing design files for both admins and customers.
  • Powerful Elements: Access 400+ shapes and a wide range of design tools for creating standout products.
  • Multilingual Support: Frontend translations ensure accessibility for a global audience.
  • WooCommerce Compatibility: Seamless integration with WooCommerce for streamlined operations.
  • Re-Design Options: Customers can easily revise and resubmit designs that were previously rejected.

Why Choose Cmsmart?

Cmsmart is a leading provider of e-commerce solutions, with years of experience in helping businesses succeed in the digital marketplace. Our NBDesigner plugin is just one example of how we empower businesses to deliver exceptional value to their customers.

What Sets Cmsmart Apart?

  • Expertise: Decades of experience in e-commerce technology ensure our tools meet the highest standards.

  • Customization: We tailor solutions to fit your specific needs, ensuring maximum impact.

  • Comprehensive Support: Our dedicated team is always available to help you implement and optimize your tools.

  • Innovation: Cmsmart stays ahead of trends, equipping your business with cutting-edge tools.

Conclusion

Integrating a Product Builder into your e-commerce store is no longer optional; it’s a strategic necessity in today’s competitive market. By empowering customers to personalize their products, improving engagement, and driving revenue growth, tools like Cmsmart’s NBDeisgner plugin offer unparalleled value.

With its robust features, seamless WooCommerce integration, and intuitive interface, NBDesigner is the ultimate solution for businesses looking to elevate their product customization capabilities.

Ready to take your store to the next level? Explore the NBDesigner Demo today or contact our support team, for personalized guidance. Use the coupon code MAR_DL to get an 18% discount on your purchase.

Let Cmsmart help you create exceptional shopping experiences and build lasting customer relationships!

Follow this tutorial video for reference: 


—————————– Thanks for your following ——————————

Elevate your store with Cmsmart

Enhance your eCommerce with our powerful plugins and explore fully built demo stores to see them in action.


Top